Setup
Below you will find the required steps to integrate the wappier Optimization SDK in your application
Android
The following setup is for developers using Gradle to manage dependencies. wappier Android SDK supports Android v4.1.x Jelly Bean (API Level 16) and above.
Below you will find the required steps to integrate the wappier Optimization SDK in your application:
① Import Libraries
You should import the Wappier Optimization SDK from a Maven Repository. After that, you need to proceed by following the steps below:
- Configure the Maven repository in the build.gradle:
repositories {
    google()
    mavenCentral()
}
AND
allprojects {
    repositories {
        google()
        mavenCentral()
    }
}
- For the Wappier full Optimization SDK, open app\build.gradle and add the dependency:
dependencies {
    implementation 'com.wappier:WappierSDK:X.X.X-nobillingRelease'
}
- For the Wappier Pricing Optimization SDK, open app\build.gradle and add the dependency:
dependencies {
    implementation 'com.wappier:WappierSDK:X.X.X-pricingRelease'
}
Otherwise, you should the Wappier Optimization SDK manually. Please copy WappierSDK-x.y.z-nobillingRelease.aar file at the libs folder and add it to the project build path.
By integrating the WappierSDK-x.y.z-billingRelease.aar to the SDK, we can identify the billing country of the end user. In addition to the correct SDK integration, a new in-app product must be created on your Google Developer Console, for the correct billing country identification.
If ProGuard is enabled, the following rules should be added to the ProGuard rules:
-keep public class com.wappier.** { *; }
For Google Libraries, add the following dependency to app/build.gradle file:
implementation ('com.google.android.gms:play-services-base:17.6.0') {
    exclude group: 'com.android.support', module: 'support-v4'
}

implementation 'com.google.android.gms:play-services-ads-identifier:17.0.0'
For the Wappier full Optimization SDK only, please also add the following dependencies:
implementation "androidx.recyclerview:recyclerview:1.2.0-rc01"
implementation 'androidx.constraintlayout:constraintlayout:2.0.4'
implementation 'com.google.android.material:material:1.3.0'
implementation 'androidx.cardview:cardview:1.0.0'
implementation 'androidx.core:core:1.3.2'
implementation 'androidx.legacy:legacy-support-v4:1.0.0'
implementation 'androidx.lifecycle:lifecycle-extensions:2.2.0'
② Update AndroidManifest.xml
Add the following permissions to the AndroidManifest.xml:
<uses-permission android:name="android.permission.INTERNET"/>
<uses-permission android:name="android.permission.ACCESS_NETWORK_STATE"/>
<uses-permission android:name="android.permission.ACCESS_WIFI_STATE"/>
<uses-permission android:name="android.permission.ACCESS_FINE_LOCATION"/> // this permission is optional
The wappier Android SDK is using the android.permission.ACCESS_FINE_LOCATION permission to determine the device location to serve region-specific content and features accurately.
For this reason, apps targeting Android Marshmallow (API 23) and later should prompt users to grant it at runtime instead of install time. Since users can revoke permissions at any time from the app Settings screen, your app needs to check that it has the permissions it needs every time it runs. For more details on how to achieve this, refer to this link.
If you do not handle android.permission.ACCESS_FINE_LOCATION permission for API > 23, SDK should be functional, but the location would not be accurate.
If you want to use the billing country feature, add the following permission into the AndroidManifest.xml file:
<uses-permission android:name="com.android.vending.BILLING"/>
If you have already included the billing library in your project, please make sure that you have the latest version.
Debug builds
- Enabling the wappier Optimization SDK debug logs
Add the following declaration to the AndroidManifest.xml inside the application tag for debugging purposes.
<meta-data android:name="wappier_debug" android:value="true"/>
The SDK debug logs can be captured using the Android Studio logcat.
- Enabling SSL Certificate for the Charles Web Debugging Proxy Application
We are using the Charles Web Debugging Proxy App to check the network traffic between the wappier Optimization SDK and the wappier SDK Backend. To trust the Charles proxy, you need to add a Network Security Configuration File in the app. This file can override the system default, enabling your app to trust user installed CA certificates (e.g., the Charles Root Certificate). You can specify that this only applies in debug builds of your application so that production builds use the default trust profile.
Add a file res/xml/network_security_config.xml to your app:
<network-security-config>
  <debug-overrides>
    <trust-anchors>
      <!-- Trust user added CAs while debuggable only -->
      <certificates src="user" />
    </trust-anchors>
  </debug-overrides>
</network-security-config>
Then add a reference to this file in your app's manifest, as follows:
<?xml version="1.0" encoding="utf-8"?>
<manifest ... >
    <application android:networkSecurityConfig="@xml/network_security_config" ... >
        ...
    </application>
</manifest>
iOS
The following section is for developers using Xcode 8 or later. Wappier iOS SDK supports iOS v9.0.x and above.
Below you will find the required steps to integrate the Wappier iOS SDK in the game:
① Import Libraries
Drag the WappierSDK folder into your project and make sure to select Copy items if needed, Create groups and your target app in the Add to targets section.
If you are trying to import the full wappier Optimization SDK in your project:
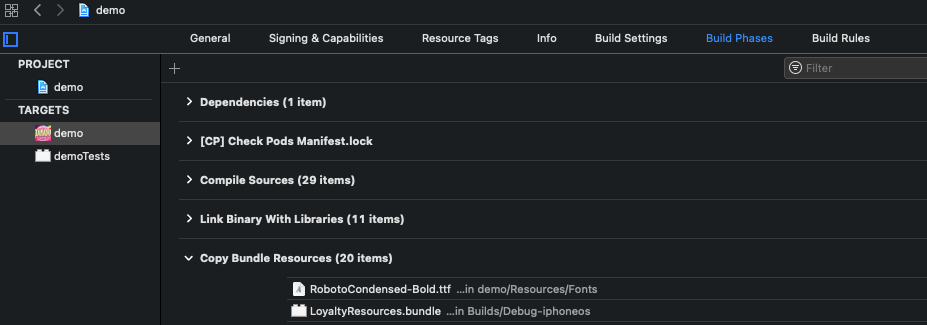
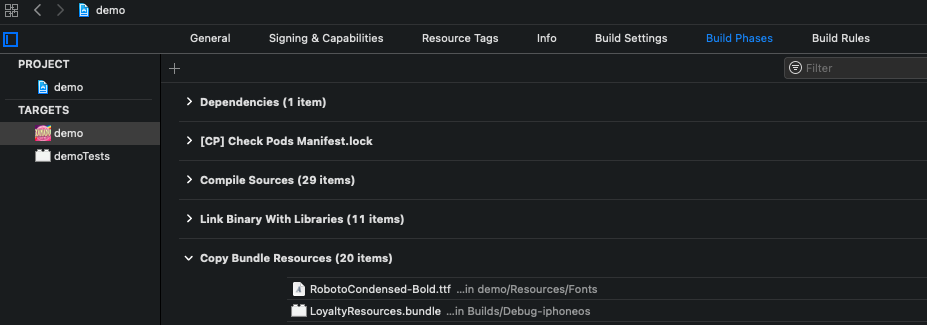
Go to YourProject > TARGETS > YourApp > Build Phases > Copy Bundle Resources and add LoyaltyRecources.bundle
② Build configuration
- Go to YourProject > TARGETS > YourApp > Build Phases > Link Binary with Libraries and add the following:
AdSupport.framework
CoreTelephony.framework
libsqlite3.dylib (for up to iOS 8) OR libsqlite3.tbd (for iOS 9+)
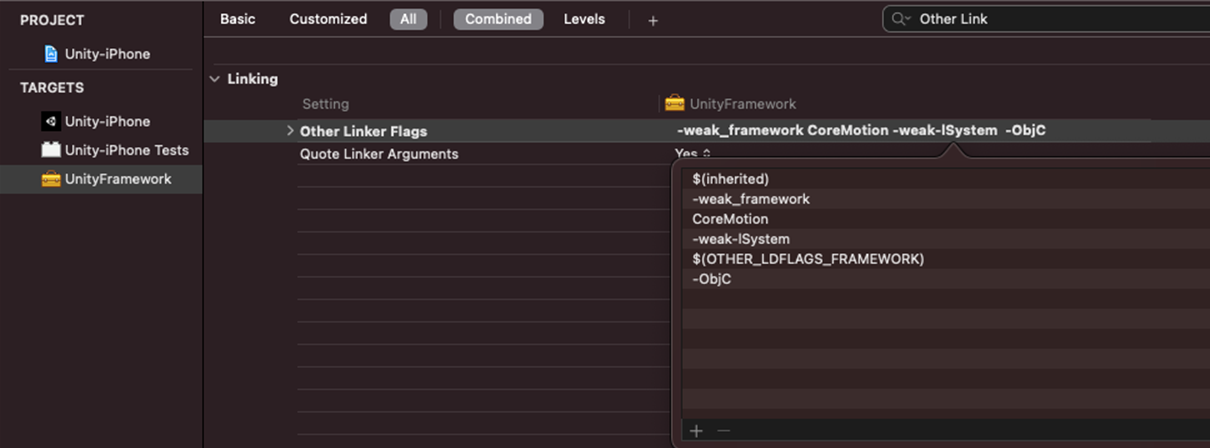
Go to YourProject > TARGETS > YourApp > Build Settings tab and search for other linker flags. Double click it and enter the following flags:
-ObjCand-lstdc++.Go to YourProject > TARGETS > YourApp > Build Settings tab and search for Bitcode. Double click it and enter the flag
No.Go to YourProject > TARGETS > YourApp > Build Settings tab and search for Enable Modules. Set the flag to
YES.Go to YourProject > TARGETS > YourApp > Build Settings tab and search for Library Search Paths and add the following if not exist:
$(TOOLCHAIN_DIR)/usr/lib/swift/$(PLATFORM_NAME)
$(TOOLCHAIN_DIR)/usr/lib/swift-5.0/$(PLATFORM_NAME)
$(inherited)
Create an empty Swift file and accept the bridging header prompt that will pop up. Add this file to your target.
Go to YourProject > TARGETS > YourApp > Build Settings tab and search for Swift. Set to
Swift 5.Go to YourProject > TARGETS > YourApp > Build Settings tab and search for Preprocessor Macros ( If there is no such configuration add it under Apple Clang-Preprocessing).
For Pricing solution add
LOYALTY=0,PRICING=1For Pricing + Loyalty & Retention solutions add
PRICING=1,LOYALTY=1

Unity
The following section is for developers using Unity 2020 or later
① Import Libraries
After importing the .unitypackage into your project:
Add the Android native Wappier SDK under /Assets/Plugins/Android
Add the iOS native Wappier SDK framework under /Assets/Plugins/iOS
② Build configuration
Instructions
- Android
- iOS
Use the Gradle build system so that the mainTemplate custom gradle file will be used, or make sure the dependencies present in that file get included.
Debug Builds
Enabling the wappier Optimization SDK debug logs: Add the following declaration to the AndroidManifest.xmlinside the tag for debugging purposes.
<meta-data android:name="wappier_debug" android:value="true"/>
The SDK debug logs can be captured using the Android Studio logcat.
Enabling SSL Certificate for the Charles Web Debugging Proxy Application: We are using the Charles Web Debugging Proxy App to check the network traffic between the wappier Optimization SDK and wappier Backend. To configure your app to trust Charles, you need to add a Network Security Configuration File to your app. This file can override the system default, enabling your app to trust user installed CA certificates (e.g., the Charles Root Certificate). You can specify that this only applies in debug builds of your application so that production builds use the default trust profile.
Add a file res/xml/network_security_config.xml to your app:
<network-security-config>
  <debug-overrides>
    <trust-anchors>
      <!-- Trust user added CAs while debuggable only -->
      <certificates src="user" />
    </trust-anchors>
  </debug-overrides>
</network-security-config>
Then add a reference to this file in your app's manifest, as follows:
<?xml version="1.0" encoding="utf-8"?>
<manifest ... >
    <application android:networkSecurityConfig="@xml/network_security_config" ... >
        ...
    </application>
</manifest>
Go to YourProject > TARGETS > YourApp > Build Phases > Link Binary with Libraries and add the following:
AdSupport.framework
CoreTelephony.framework
libsqlite3.dylib (for up to iOS 8) OR libsqlite3.tbd (for iOS 9+)
Go to YourProject > TARGETS > YourApp > Build Settings tab and search for other linker flags. Double click it and enter the following flags: -ObjC and -lstdc++.
Add the WappierSDK.framework to the embedded binaries
C++
The following section is for developers using C++ or Cocos2D v3.x or later
① Import Libraries
You can find the requisite instructions below:
- Android
- iOS
- Configure the maven repository in the build.gradle:
repositories {
    google()
    mavenCentral()
}
AND
allprojects {
    repositories {
        google()
        mavenCentral()
    }
}
- For the wappier full Optimization SDK, open app\build.gradle and add the dependency:
dependencies {
    implementation 'com.wappier:WappierSDK:X.X.X-nobillingRelease'
}
Otherwise, you can import the wappier Optimization SDK manually. Please copy WappierSDK-x.y.z-nobillingRelease.aar (for the full optimization sdk) or file WappierSDK-x.y.z-pricingRelease.aar (for the pricing optimization sdk) at the libs folder and add it to the project build path. If ProGuard is enabled, the following rules should be added to ProGuard rules:
-keep public class com.wappier.** { *; }
For Google Libraries, add the following dependency to app/build.gradle file:
implementation ('com.google.android.gms:play-services-base:17.6.0') {
    exclude group: 'com.android.support', module: 'support-v4'
}

implementation 'com.google.android.gms:play-services-ads-identifier:17.0.0'
For the wappier full Optimization SDK only, please also add the following dependencies:
implementation "androidx.recyclerview:recyclerview:1.2.0-rc01"
implementation 'androidx.constraintlayout:constraintlayout:2.0.4'
implementation 'com.google.android.material:material:1.3.0'
implementation 'androidx.cardview:cardview:1.0.0'
implementation 'androidx.core:core:1.3.2'
implementation 'androidx.legacy:legacy-support-v4:1.0.0'
implementation 'androidx.lifecycle:lifecycle-extensions:2.2.0'
Drag the WappierSDK.framework and WappierCppWrapper.framework into your project and make sure to select Copy items if needed, Create groups and your target app in the Add to targets section.
If you are trying to import the full wappier Optimization SDK in your project:
Go to YourProject > TARGETS > YourApp > Build Phases > Copy Bundle Resources and add LoyaltyRecources.bundle
② Build configuration
- Android
- iOS
Shared libraries have been built against c++_static stl and std c++11.
Select the build that matches your build process, cmake or ndk-build. The respective build can be found under the corresponding folder.
Include the WPAndroidHelper.h.
Modify AndroidManifest.xml and add :
<provider
android:name="android.arch.lifecycle.ProcessLifecycleOwnerInitializer"
android:authorities="${applicationId}.lifecycle-process"
android:exported="true"
android:process="com.wappier.wappierSDK.lifecycle"
tools:replace="android:authorities,android:exported" />
Debug Builds
Enabling the wappier Optimization SDK debug logs:
Add the following declaration to the AndroidManifest.xml inside the tag for debugging purposes.
<meta-data android:name="wappier_debug" android:value="true"/>
The SDK debug logs can be captured using the Android Studio logcat.
Enabling SSL Certificate for the Charles Web Debugging Proxy Application:
We are using the Charles Web Debugging Proxy App to check the network traffic between the wappier Optimization SDK and wappier Backend. To trust the Charles proxy, you need to add a Network Security Configuration File to your app. This file can override the system default, enabling your app to trust user installed CA certificates (e.g. the Charles Root Certificate). You can specify that this only applies in debug builds of your application, so that production builds use the default trust profile.
Add a file res/xml/network_security_config.xml to your app:
<network-security-config>
  <debug-overrides>
    <trust-anchors>
      <!-- Trust user added CAs while debuggable only -->
      <certificates src="user" />
    </trust-anchors>
  </debug-overrides>
</network-security-config>
Then add a reference to this file in your app's manifest, as follows:
<?xml version="1.0" encoding="utf-8"?>
<manifest ... >
    <application android:networkSecurityConfig="@xml/network_security_config" ... >
        ...
    </application>
</manifest>
Go to YourProject > TARGETS > YourApp > Build Phases > Link Binary with Libraries and add the following, if not already present:
AdSupport.framework
CoreTelephony.framework
libsqlite3.dylib (for up to iOS 8) OR libsqlite3.tbd (for iOS 9+)
Go to YourProject > TARGETS > YourApp > Build Settings tab and search for other linker flags. Double click it and enter the following flags: -ObjC and -lstdc++.
Add the WappierSDK.framework to the embedded binaries
Go to YourProject > TARGETS > YourApp > Build Settings tab and search for Bitcode. Set the flag to
NO.Go to YourProject > TARGETS > YourApp > Build Settings tab and search for Enable Modules. Set the flag to
YES.Create an empty Swift file and accept the bridging header prompt that will pop up. Add this file to your target.
Go to YourProject > TARGETS -> YourApp > Build Settings tab and search for Swift. Set to
Swift 5.Go to YourProject > TARGETS > YourApp -> Build Settings tab, search for Library Search Paths and add the following if not exist:
$(TOOLCHAIN_DIR)/usr/lib/swift/$(PLATFORM_NAME)
$(TOOLCHAIN_DIR)/usr/lib/swift-5.0/$(PLATFORM_NAME)
$(inherited)